Tuesday 13 September 2011

Removal of Stump from Large Sugar Gum

Further to our blog of 1st September 2011 sharing some of the details of having the large Sugar Gum tree out the front of the house here removed - today Maurice from Lachlan Valley Tree Services returned with his trusty  stump grinder to remove the stump.
Here you can see the 'Red Roo' SP8018 stump grinder positioned over the stump prior to the start of the job. These 80 horsepower machines cost on the order of $80,000 and are a serious bit of gear.

Here is a close-up of some of the 32 tungsten tips 'teeth' on the cutter wheel. They comfortably handle timber and soil, and can be used for cutting rock and concrete - but the latter is tough going. Steel if in the soil or timber causes considerable damage to the teeth.

The machine is controlled via this handy wireless remote control unit.

You'll find a short (6 seconds) video showing the stump grinder in action here.

The above photograph was taken about half way through the removal process. The dark area you can see in the middle of the stump is a large white ant nest.

Here's a close-up of a section of the white ant nest.

The above photo was taken at the completion of the grinding effort. There was a very large amount of wood chips mixed earth with produced during the process, with the actual stump proving to have been about 50 cm deep in all.

We agreed with Maurice that we would move the excess mulch ourselves. Here you can see our trusty trailer almost fully loaded.

We moved the mulch to a couple of 'scalded' areas of bare earth in the Yabby Dam Paddock. One spot is below. Our hope is that over time this added organic matter will encourage vegetation to grow and rainfall runoff to reduce.

The photo above is one of the other scalded areas in the Yabby Dam Paddock just to the west of the dam, with the mulch placed at the down-side of the contour bank.

The vast majority of the timber in the stump is pulverised into quite fine pieces, but you can see in the above photo that some pieces are pretty 'chunky'. This happens when pieces break off rather than be ground off.

The above shot shows the 'finished product' after we'd removed the excess mulch and done a tad of leveling. We do expect that over time the material that is in the hole where the stump was will compact and break down. At that time we plan on bringing in some topsoil to level things off again.

It's good to now have the whole job of removing the massive and dangerous tree complete.

Tuesday 6 September 2011

Bees, Wattle and Emus

Earlier this morning we checked our lambing ewes up in the Big Pine Paddock. On the way back we saw something light blue and out of place in the distance in our Spring Paddock and drove up to investigate.
It transpired that what we were seeing (above) was 27 bee hives left in the paddock left without our knowledge or permission. All of the hives had a common number on them which we deduced was a registration number. A quick search of the internet brought to light some contacts in the NSW Dept of Primary Industries who are involved in regulating the bee industry. A call to the main contact for NSW resulted in us being given the name and phone number of the bloke who owns (unless the hives have been sold or stolen) the bees. He lives in Bathurst and we have at this point left a message with his daughter for him to ring us back.

This afternoon we walked up to the Spring Paddock to see if the hives were still there. They were, and we took the photographs in this blog post. On the way there we walked past the enclosure we constructed last year where we transplanted some wattles. Of the 10 we transplanted from roadside reserves 4 are thriving and one was in full flower as you can see above.
As we approached the spring we saw 5 emus near it (above), all of which seem to have recently decided to call our place home. The spring is the most easily accessible permanent water point in the north east part of our place and it seems this is where they are regularly coming for water.

At the spring itself it was a bit of a surprise to see and hear just how many bees from the hives were sourcing water there. It was truly 'buzzing'. On the way from the spring to the hives there was quite a flow of two-way bee traffic. At the hives themselves we took a 12 second video which you can access of YouTube here. We also took a close-up still shot of one of the hives (below) where you can see the access point into the hive itself.
It looks a bit like honey around the entrance but we are not sure.

Monday 5 September 2011

Bird Habitat Clusters Constructed and Planted


In July this year we entered a Management Agreement with the Lachlan Catchment Management Authority to establish ten 10 by 10 metre bird habitat ‘clusters’ spread across 7 paddocks located to the north and east of the farm. Each is to contain trees and shrubs, and collectively they are designed to act as ‘stepping stones’ allowing native birds to move more safely across the broader landscape. Funding toward the fencing and planting comes ultimately from the Federal Government’s “Caring for Our Country” initiative.

Once the Management Agreement was signed we set about putting in all the posts and strainers at each cluster location. To make this easier we made up a template out of baling twine that would allow us to easily locate where the posts should go and ensure each was in fact square and 10 metres by 10 metres. For the fans of algebra we used the formula for triangles of A2 X B2 = C2, and physically tied knots in the twine at 5 metre intervals for two sides (each 10 metres long) then a gap of 14.14 metres for the hypotenuse.
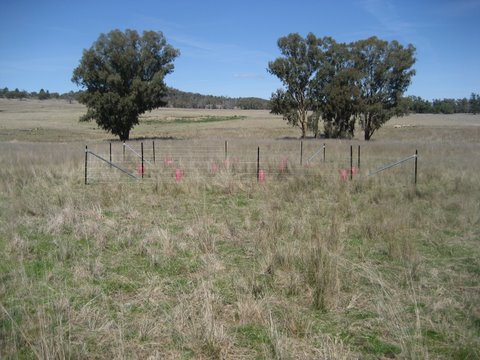
In the photograph above you can see the final / standard layout of the posts and stays at each site.
Here you can see the stay arrangement we used. These are specifically designed to be ‘temporary’ and were manufactured for us by M A Steel at Young. The original design was from David Marsh at Boorowa who uses them for temporary electric fencing.


You can see in the above photograph that top of the stay is slipped over a star post and attached with wire. The base is anchored using another star post, visible in the second photo above/

One component of the project involved ornithologist Tony Saunders calling to assess the property for birdlife potential and to share his knowledge. When it came time to select the species to plant we sought his additional input as we wanted to make sure we maximised the value to our local birdlife from the exercise. Here is a selection of his comments … which of course we found most helpful:
  • "Go with the 3 trees and 10 shrubs for each 10m x 10m cluster.
  • Make each cluster planting as random as possible. This will put some shrubs in shade and others in full sun, as well as provide some clusters with scattered shrubs while others will have a patch of dense shrubs.  Make them as different as possible.  It would be interesting to monitor the clusters through time and see how effective they become for wildlife.
  • I suggest a mixture of shrubs from the approved list for your area.  The shrubs should be predominantly Acacias, but the species should not aim for equal numbers of each.  In natural areas there is generally a dominant species followed by lesser numbers of subordinate shrub species, so I suggest planting the 10 shrubs in a ratio of 4:3:2:1.  The actual species can be selected from the list to match the closest existing similar patch to the cluster.
  • Based on the location of the proposed clusters and what I recall from the location of existing tree species, I suggest that the tree species should be as follows: Front, Saddle, Duck Dam and Yabby Dam -  2 Grey Box and 1 Yellow Box per cluster; Yellow Box  -  3 Yellow Box per cluster; Crater and Plateau  -  2 White Box and 1 White Cypress Pine per cluster

The shrubs within each cluster should provide some passage habitat for small birds, and the White Cypress Pine/Gum mix will provide for the Grey-crowned Babbler.  The clusters are probably too small to provide sufficient resources for residency by small birds.  Glossy Black Cockatoo prefer large, dense patches of Allocasuarina species, and I doubt that they will find much use for the suggested clusters."

Armed with the above information we set off to acquire what plants we could. It eventuated that we could not source two species of shrub, Silver Casia and Angular Hopbush, so we substituted these for Wedge Leaf Hopbush. Suppliers were Gum Tree Nursery at Young and Oz Plants at Cowra.

Another important aspect was how best to actually do the planting and what materials and treatment to apply. Matt Kilby from Global Land Repair was who we went to for advice and supplies. Here’s a summary of the planting process we used:
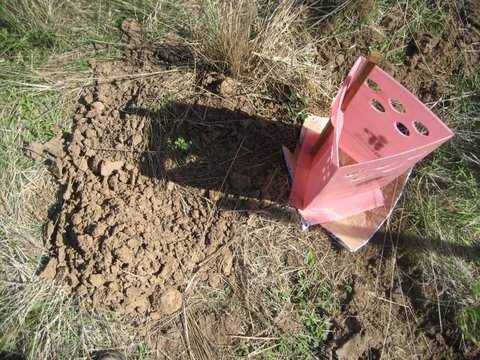
  • Dig a hole about 400 mm deep and 30 cm across
  • Create some bull swales out both sides from the hole which will channel runoff into it when it rains in the future.
  • Mix a cup of tree starter into the loose soil that will go back in the hole when planting the tree.
  • Have a mix of tonic in a bucket. Soak the plants whilst still in the tube in the tonic mix to ensure the soil in the plant tube is completely hydrated.
  • Remove the plant from the tube and spread a heaped tablespoon of the soil mycorrhiza around the soil covering the tree roots and at the base.
  • Plant the tree in the hole with the base of the tree below natural ground level. Make the remaining hole ‘cone’ shaped so that water will run in it naturally and large enough to hold about 10 litres of water.
  • Make a hole in the centre of the mulch mat that will end up being where the tree stem comes through. Place the mat in the cone shaped hole around the base of the tree. The pre-cut bits of the mat should thus overlap slightly.
  • Place the tree guard over the tree and drive in the stake.
  • Pour about 5 litres of mixed tonic at the base of the tree.

We recently finished all of the work. The biggest unexpected learning from doing the planting was seeing the diversity of soil types and profiles when digging the holes for the plants, down to about 30-40 cm. They range from heavy clay, to sandy loam, to coarse 'breaking down' granite.

What follows are photographs of each of the clusters by paddock name and cluster location together with some shots of what the soil profile looked and plant species that were put in the ground. All of the landscape photos have been taken in the direction rain water will naturally flow when it does rain i.e. from the high side looking down-slope. Thus the photos are indicative of the aspect of that particular piece of land and it will be relatively straight forward for us to take subsequent monitoring photos from approximately the same position should we choose to.

1. Crater Paddock – East
Here's the Crater Paddock - East cluster. The Weddin Mountains are coincidentally just visible on the horizon on the right hand side.

Here's the first soil profile sample. Breaking down granite toward the bottom.

Here's the second soil profile sample. Breaking down granite toward the bottom mixed with a type of light grey clay.

The plant species put into the soil in this cluster were: White Box, 2, White Cypress Pine, 1, Currawang, 1, Varnish Wattle, 3, Wedge Leaf Hopbush, 2, Western Golden Wattle, 4, Aspect SSE

2. Crater Paddock – West
Here's the Crater Paddock - West cluster. The Bogolong Hills are visible in the background.

The soil profile at this location is weathered granite but a brighter ochre colour.

The plant species put into the soil in this cluster were: White Box, 2, White Cypress Pine, 1, Currawang, 2, Hickory, 4, Varnish Wattle, 3, Wedge Leaf Hopbush, 1, Aspect SE/Flat

3. Duck Dam Paddock

The Duck Dam is visible in the background, quite full at the moment.

The soil profile at this cluster has a high clay content. In one place we noticed what seemed to be a fine salt layer at around 30 cm which immediately preceded what we call 'cement rock' - an impervious layer best described and compacted clay. It proved necessary with two of the 13 holes to use the crow-bar in order to get sufficient depth.

The plant species put into the soil in this cluster were: Grey Box, 2, Yellow Box, 1, Currawang, 3, Varnish Wattle, 4, Wedge Leaf Hopbush, 1, Western Golden Wattle, 2 Aspect North

4. Front Paddock

At the back of this view of the cluster in the Front Paddock can be seen the hill that has Lookout Rock on it, and in the mid-ground a few quite impressive Yellow Box trees.

The soil profile at this cluster was very damp heavy clay, which made for the toughest digging as it was quite labour intensive to remove the material from the auger. The above photo was taken the day after planting had occurred and some drying of the soil had occurred.

The plant species put into the soil in this cluster were: Grey Box, 2, Yellow Box, 1, Currawang, 4, Varnish Wattle, 1, Wedge Leaf Hopbush, 2, Western Golden Wattle, 3, Aspect, S

5. Plateau Paddock – East

At the rear of this cluster can be seen the trees in the gully below what is normally a dry dam, and across to the Crater Paddock.

Here you can see the coarse broken down granite sub-soil at the rear of one of the plant guards. This was particularly easy digging. Also in the photo is the mini-bull-swales created to channel runoff to the plant thus theoretically reducing the need for watering of the plants in the early stages.

The plant species put into the soil in this cluster were: White Box, 2, White Cypress Pine, 1, Currawang, 2, Varnish Wattle, 4, Wedge Leaf Hopbush, 4, Aspect, NNW

6. Plateau Paddock – West
The view from this site is similar to the last with the exception that a neighbour's Canola crop in full flower is to the right.

The soil profile was the same as for the Plateau Paddock - East site.

The plant species put into the soil in this cluster were: White Box, 2, White Cypress Pine, 1, Deane's Wattle, 2, Hickory, 4, Varnish Wattle, 1, Western Golden Wattle, 3 Aspect, NE

7. Saddle Paddock

This site is the closest to Goodes Lane and thus the easiest to see by the passing traffic.

The sub soil was wet and quite sandy. This site had an awesome number of active worms detected during digging. This augers well for future pasture health.

The plant species put into the soil in this cluster were: Grey Box, 2, Yellow Box, 1, Deane's Wattle, 2, Hickory, 3, Wedge Leaf Hopbush, 1, Western Golden Wattle, 4, Aspect, SW

8. Yabby Paddock - North

The Saddle Paddock cluster is in the background of this photo (trust me!).

This site was the driest of all, which we attribute to the impact of the contour bank slightly up-hill. In a couple of locations there was a cover of Redgrass which proved quite a challenge to dig through as the plants create a solid mass of vegetation just below the surface. The Couch Grass was also very thick at this site.

The plant species put into the soil in this cluster were: Grey Box, 2, Yellow Box, 1, Deane's Wattle, 3, Wedge Leaf Hopbush, 3, Western Golden Wattle, 4, Aspect, NNW

9. Yabby Paddock - South

A quite similar background to the other cluster in this paddock.


 This site had the most diverse sub-soil profiles of any of the 10 as the above 3 photographs show.

At one point I finished digging one of the holes and went away for a couple of minutes to retrieve another implement. On return I found this 'surprise' at the bottom of the hole. Obviously it had inadvertently entered and was unable to escape. We think it is some type of juvenile Brown Snake but someone else has suggested it might be a type of Legless Lizard. We released it to under a nearby low bush.

The plant species put into the soil in this cluster were: Grey Box, 2, Yellow Box, 1, Currawang, 2, Varnish Wattle, 3, Wedge Leaf Hopbush, 4, Western Golden Wattle, 1, Aspect, NNW

10. Yellow Box

 The above photograph was taken on disk and is not quite as clear as the others. The trees you can see to the left are in Ochre Arch gully. This site will also be visible from Goodes Lane, especially as the trees grow.

The sub-soil colour at this site is a vibrant ochre, verging on orange red. Quite stunning and very friable.

The plant species put into the soil in this cluster were: Yellow Box, 3, Currawang, 2, Deane's Wattle, 4, Varnish Wattle, 1, Wedge Leaf Hopbush, 3, Aspect, N

In Conclusion
We now look forward to watching the plants grow, and in time be used by the birds in the area. On the weekend just gone we did our first watering of the plants via natural syphon from our fire-fighting tank. In all it took about 1.5 hours and as we get better at it we expect the time to reduce to around one hour. Not bad at all, and will be important during the summer months.

Removal of Large Sugar Gum 1st September 2011

On Thursday 1st September 2011 a team of 4 from Lachlan Valley Tree Services Pty Limited (Phone 02 6341 1458) based at Cowra came and removed the monstrous Sugar Gum tree located immediately to the north of the house and east of our smaller machinery shed. The team from Lachlan Valley Tree Services comprised Maurice (owner), Oliver (key man who scaled the tree and lopped most of the top of the tree using ropes and a light saw), Michael (experienced lopper, whose core day job is actually doing forensics on fires across most of rural NSW) and Scott (labourer – and it was his first day on the job).

The tree can be seen in this photograph prior to removal. Surprisingly it was planted in about 1948 meaning it was only 63 years old – with the growth rate having obviously been quite impressive.

The primary driver of our decision to remove the tree was concerns for our personal safety and potential damage to property due to the high risk of limbs falling. Sugar Gums are renowned for this. We also discovered during the removal process that the tree was heavily infested with white ants. The other benefits of the tree removal include:
  • Our solar hot water system tubes will no longer be shaded in the morning meaning it will be able to perform to full potential
  • It should now be possible to get some ground cover / grass to grow to the north of the house reducing the amount of dust
  • There will be a significant reduction in the volume of leaves entering the gutters, reducing the need for regular cleaning
  • Elimination of the litter that fell on the ground where we have kept our garbage bins

Countering these benefits are the following downsides of the tree removal:
  • The tree did act as a significant bird habitat and rest spot
  • We will no longer enjoy the relief from the direct summer sunlight on the north of the house
  • The tree did add value to the general aesthetics of the front of the house
  • The hollow in the trunk did at one point provide habitat for “The Boss” – a 2 metre Lace Monitor


What follows are a selection of photographs and short videos taken during the day.
One of the first steps was setting up the tree felling rope controller onto the base of the trunk of the tree. Here you can see Ollie (L) and Maurice (R) at work with a chainsaw creating a vertical flat section.

Here you can see the rope controller in close-up installed. It acts something like the things you see on sailing boats. A length of rope goes from the limb being removed, through a pulley attached to a branch close to the one being removed and strong enough to hold the weight of the lopped branch, several times around the centre of the controller, and into the (gloved) hands of the person on the ground who will be managing the descent of the pruned limbs to ensure safe landing on the ground.

Here you can see Ollie suspended by his ropes just after felling a a major limb from the tree. Michael commented to Jan at one point that Ollie is considered 'the fastest chainsaw-er this side of Katoomba. He also happens to have his own tree services business based at Bathurst, and was sub-contracted on the day by LVTS.
Here's a pretty neat shot of Ollie 'suspended' on one of the tree limbs. Note the special spikes gripping gear on his lower legs and shoes. He also happens to be highly skilled in rope working and knot tying.

The above photograph shows what was left of the tree once Ollie had done what he could using ropes and actually climbing the tree. Getting to this stage took about 1 hour in total - very quick.

Here you can see the 'cherry picker' brought into action for the remainder of the above ground lopping work. In the bucket were Ollie and Michael, with Scott (L) and Maurice (R) watching on to begin with.

Here is a link to a short (10 second) YouTube video showing one of the branches from the top of the tree being felled. http://www.youtube.com/watch?v=bquCFqaoNI4 If you look closely you will notice how the limb is controlled from the ground using the rope. Maurice was the one on the ground doing this. His skill in using the swing of the limb to time it so that it missed the shed was impressive. In this 8 second video you will see another limb falling directly to the ground. http://www.youtube.com/watch?v=R8j7V-uR6yc Sorry for the quality of the videoing in this one. It was a tad unnerving seeing such a limb falling towards me ... although I was of course very safe, being a long way back from the direct action.

In this photograph you can see Ollie doing the final cut on to fell the last of the main stem of the tree. You will also notice a rope attached to the upper part of the limb. The rope was what's called a 'bull rope' of around 30 mm in diameter. It is 50 metres in length, cost about $1,000 2 years ago and is a critical bit of gear with felling large trees. At the other end of the rope was the Bobcat being driven by Maurice. Here is a 9 second video showing the actual fall of this limb to the ground. http://www.youtube.com/watch?v=ndV8w1ZLtAM Both Jan and I were somewhat in awe at the skill of Maurice, Ollie and Michael and their ability to 'see' in advance where each limb would fall ... and more particularly the way they communicated at all times ... being rightly obsessed about the safety of people and property.

 The Bobcat was and is one of the most handy bits of equipment for tree removal. There seemed to be not much it could not do or handle in the hands of Maurice. Here you can see him moving a single bit of trunk that would have been close to 1 tonne in weight.

 It was then on to removing the main stem of the tree which at the point you can see in the above photo was in excess of 1.3 metres in diameter. Ollie first removed the wedge you can see on the ground. Michael then used an axe to create a cut into the back of the cut, following which Ollie used the saw to cut further into the centre of the trunk.

Ollie then went to the back of the trunk and cut all the way through to immediately above the horizontal bit of where the wedge had been removed. You can see him doing this in the above photo. Michael drove a wedge into the centre of the back of the big cut to ensure continuing gap for the saw blade and to assist with the eventual felling of the trunk.

Once the cutting was done the bull rope was attached to the top of the main trunk and the Bobcat with Maurice at the helm. This 5 second video shows the main trunk coming down to the ground. http://www.youtube.com/watch?v=7qvfLVQ0mYA

In the above photograph you can see the main trunk after it toppled to the ground as mentioned above.  

Here is a close-up of the remaining main trunk at that point. Michael and Ollie pointed out that this was a 'text book' fell of the main stem. The two 'rough bits' you can see at the extremities of what was where to wedge was removed actually physically act a hinges for safe toppling.

It was then over to Ollie to cut the remaining short section of the truck off at just above ground level. Here you can see him using the big Husqvarna chain saw for this purpose. Ollie is not at all a fan of this brand of chain saw as they can be difficult to start and lack the 'grunt' of the Stihl chainsaws. I noticed that all chain sharpening was done using a file. They don't use electric sharpeners because the grinding wheels tend to overheat the steel reducing the steel quality which translates into more rapid blunting of the cutting edge.

It was then time to reduce the bulk of the main trunk from what was estimated to be 6 tonnes. During this process one cut proved not worth proceeding with as something hard was embedded into the core of the trunk which made the chain instantly blunt. It may have been that many years ago a piece of steel or stone was left in what at that time may have been a fork in the tree. It's not a good idea to place of hit hard objects into trees that may need to be removed in the future.

Once the main trunk was reduced to a more reasonable size it was then up to Maurice and his trusty Bobcat to move it to the storage location. In this 6 second video http://www.youtube.com/watch?v=zdKbbzgfEbw  you can once again see just how handy a Bobcat is in the hands of a good operator.

The only task that now remains is grinding out of the stump. Maurice will return in the next week or so to do this. Jan and I have nothing but praise for the work done by Lachlan Valley Tree Services. They are not cheap but there's no question about their skill and commitment to their craft. Having all the right gear helps as well ... and being obsessed about safety as they are is paramount.


In closing, above is a photograph of the house and shed taken from the same positioning as the 'before' photo ... quite a change!