It proved a fairly labour intensive activity.
The first step was to remove the old concrete floor. It turns out that the original construction method was basically:
- Create a layer of sand
- Bring in rocks, presumably from off the farm somewhere, and set them up so that the tops were reasonably level
- Fill the gaps between the rocks with more sand, creating a relatively level surface
- Pour a layer of concrete on top and level off as best as they could
From what we could see the old concrete most likely had no cement mixed into it and was more like a mortar. It certainly was not reinforced in any way. Whilst we did borrow a jackhammer to help break up the old surface it proved a bit of over-kill in that the old material shattered making it time consuming to move out of the shed. We ended up cracking the old surface with a crowbar and moved the material in pieces.
A big question was 'What to do with the old material'? The answer ... something useful without carting it too far away. It turns out there's a deep hole in one of the creeks not far from the house that continues to get bigger each time we have a major fall of rain. The 'fill' is clean and comprises the concrete and some of the rocks. Here you can see us off-loading some of the stuff from our trailer. With luck the hole in the creek will now no longer get any bigger.
The following photograph is a progress shot in getting the surface ready for the blokes who we selected to lay the replacement concrete. Basically we re-used most of the rocks but buried them in the old sand. On the right side of the picture you can just see the level sand surface. As the new concrete was to be 100 mm thick we used several pieces of baling twine to act as the leveling guides together with a piece of timber that was 100 mm wide, dragging the latter across the surface to finish it off.
All in all it took us a day to remove the old surface and two days to level the sand.
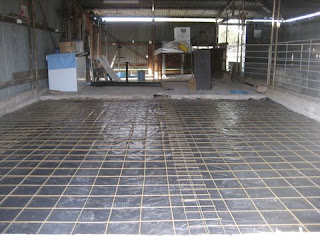
Next step was for the professional concrete company (Makcrete Concrete Services in Grenfell ... they were excellent) to prepare the level surface prior to the concrete pour. Here you can see the result, with the plastic layer in place overlaid with the steel reinforcing. Nice job!
Then it was time for the concrete pour, and here's an action progress shot.
The chute from the concrete truck is visible in the foreground. In the background you can see Justin and Matt flat-chat moving the slurry into place quickly before it set. One thing about concreters ... they certainly earn their money at this point!
Once all of the concrete was roughly in place and fairly level Matt uses a 'bull float' to do the initial final level (if that makes sense). Here he is in action:
Over the next couple of hours as the concrete cures an automated trowel (AKA helicopter or whirly bird) is used. It serves to properly level the surface, force the gravel under the surface and create a proper surface prior to drying. Here's a link to a short video of the machine (guided by Justin) in action:
After 3 days the new concrete was ready for use. Here's a shot of the final product. Perfect!
The other major non-routine task getting the shed ready was repairing the roof on the skillion on the western side. When originally constructed second hand iron was used. Thus there were plenty of holes to fill in using silicon, and it also proved necessary to replace a whole bunch of nails and screws. Another aspect was that a year or so ago the flashing that covered the gap between the main section of the roof and the skillion blew off in a very strong wind storm and needed replacing. The question was: "How to do this cheaply, effectively and in a way that continued to allow light into the shed"? The answer took a long time to come up with but was very simple in concept: take one piece of poly-carbonate, cut lengthwise into 4 equi-strips, and install using specially designed screws used solely on poly-carbonate sheeting. In this photo you can see the final product.
During the shearing earlier this week (further blog to come) the poly-carbonate solution proved to be just what we needed ... especially given that it rained a few times.


No comments:
Post a Comment